
Whether you are a gem maintaining machine or new to the world of authoring gems, this tutorial is for you. Adhereing to SemVer and keeping an updated changelog are both important components in well maintained open source, but they are also a pain at times. This tutorial will walk you through a simple way to create a release process that automates the small, but important, parts of maintaining a Ruby gem.
Release Please#
Release Please Action is a GitHub action created by Google to automate releases with Conventional Commit Messages. As you merge PR's into your main branch, the action will create/update a new release branch that automatically adds your commits to a changelog and bumps the version according to your commits. When you're ready to release your changes, merging the PR will cause a new GitHub release to be created and released. We can even automate publishing to package registries like RubyGems!
Conventional Commits#
This article will assume you are familiar with Conventional Commits. Here is a brief overview of the important prefixes, pulled from the action's README
The most important prefixes you should have in mind are:
fix: which represents bug fixes, and correlates to a SemVer patch.feat: which represents a new feature, and correlates to a SemVer minor.feat!:, orfix!:,refactor!:, etc., which represent a breaking change (indicated by the !) and will result in a SemVer major.
I've considered doing a longer article about how I use conventional commit messages in my workflow, so let me know if you'd be interested in that.
Testing it out#
I'm going to create a new gem to demo this action's functionality:
bundle gem release-please-demo --test=rspec --ci=github
cd release-please-demo
bundle install
Skip to the bottom if you'd just like to see the result!
Next we will need to update our gemspec if we want to publish the gem. I'm not going to go over this right now, but if you're curious to learn more about how to setup a Ruby gem specification, I suggest checking out this great article by Piotr Murach.
This is what my release-please-demo.gemspec looks like after filling in the TODO placeholders Bundler leaves for the summary and description, removing the allowed_push_host line (that placeholder only matters for a private gem server, so leaving it out publishes to public RubyGems), and uncommenting the rubygems_mfa_required line (recommended):
# frozen_string_literal: true

require_relative "lib/release/please/demo/version"

Gem::Specification.new do |spec|
  spec.name = "release-please-demo"
  spec.version = Release::Please::Demo::VERSION
  spec.authors = ["Andrew Mason"]
  spec.email = ["REDACTED@andrewm.codes"]

  spec.summary = "Demo of release-please."
  spec.description = "A demo gem showing how to use release-please to automatically version gems."
  spec.homepage = "https://github.com/andrewmcodes/release-please-demo"
  spec.license = "MIT"
  spec.required_ruby_version = ">= 3.2.0"
  spec.metadata["homepage_uri"] = spec.homepage
  spec.metadata["source_code_uri"] = "https://github.com/andrewmcodes/release-please-demo"
  spec.metadata["changelog_uri"] = "https://github.com/andrewmcodes/release-please-demo/blob/main/CHANGELOG.md"
  spec.metadata["rubygems_mfa_required"] = "true"

  # Specify which files should be added to the gem when it is released.
  # The `git ls-files -z` loads the files in the RubyGem that have been added into git.
  gemspec = File.basename(__FILE__)
  spec.files = IO.popen(%w[git ls-files -z], chdir: __dir__, err: IO::NULL) do |ls|
    ls.readlines("\x0", chomp: true).reject do |f|
      (f == gemspec) ||
        f.start_with?(*%w[bin/ Gemfile .gitignore .rspec spec/ .github/ .standard.yml])
    end
  end
  spec.bindir = "exe"
  spec.executables = spec.files.grep(%r{\Aexe/}) { |f| File.basename(f) }
  spec.require_paths = ["lib"]
end
Since the purpose of this article is to focus on the release cycle, we are just going to use the gem that Bundler scaffolded without any code changes. If you were building you own gem, this is the part where you would add functionality to the gem.
Setting up the action#
Let's build our release action:
touch .github/workflows/release.yml
Open this in your code editor of choice.
First we are going to set the name of the action, and when it should run. We only want this action to run when something is merged into the default branch, or a release branch depending on your workflow. I name my default branch main, so every time code gems pushed to main, we will run this action.
# .github/workflows/release.yml

name: release

on:
  push:
    branches:
      - main
Next we need to setup a job for the Release Please Action. As of v4, configuration moved out of the workflow's with: block and into two files that live at the root of your repo: a release-please-config.json that describes each package, and a .release-please-manifest.json that tracks the current version. Please view the official configuration documentation to learn more.
Here is release-please-config.json for our gem. Options are annotated with comments (real JSON can't have comments, so strip these before committing):
{
  "$schema": "https://raw.githubusercontent.com/googleapis/release-please/main/schemas/config.json",
  "packages": {
    // "." means the package lives at the repo root
    ".": {
      // The release type
      "release-type": "ruby",
      // The name of our gem
      "package-name": "release-please-demo",
      // Path to the version file to increment
      "version-file": "lib/release/please/demo/version.rb",
      // Where the changelog is written
      "changelog-path": "CHANGELOG.md",
      // Should breaking changes before 1.0.0 produce minor bumps?
      "bump-minor-pre-major": true,
      // Tag releases as v1.2.3 rather than 1.2.3
      "include-v-in-tag": true
    }
  }
}
And .release-please-manifest.json, seeded with your current version:
{
  ".": "0.1.0"
}
Now the workflow itself. It needs contents: write and pull-requests: write permissions so the action can push the release branch and open the PR, and we pass the built-in GITHUB_TOKEN:
permissions:
  contents: write
  pull-requests: write

jobs:
  release-please:
    runs-on: ubuntu-latest
    steps:
      - uses: googleapis/release-please-action@v4
        id: release
        with:
          token: ${{ secrets.GITHUB_TOKEN }}
We are going to do some more cool things in a second, but let's go ahead and see what this produces. Before the first push, two bits of housekeeping:
- Remove the failing sample spec. Bundler scaffolds a test that asserts
expect(false).to eq(true), so themain.ymlCI it adds with--ci=githubfails until you delete it. - 🚨 Deal with
Gemfile.lock. Release Please's Ruby updater bumps the version inversion.rband the lock'sspecs:section, but not Bundler's newerCHECKSUMSsection (release-please#2720). Since lockfile checksums are on by default in Bundler 2.6+ (and Bundler 4 / Ruby 4.0), a committed lock ends up internally inconsistent after each bump, and the release job's frozenbundle installfails with exit code 16. Two ways to avoid it:- Don't commit the lock: add
/Gemfile.lockto.gitignore. This is the conventional choice for a library gem anyway. - Keep the lock but drop its checksums: run
bundle config set --local lockfile_checksums falseand regenerate the lock withbundle install. With noCHECKSUMSsection there's nothing for the version bump to leave stale. (--localwrites.bundle/config, which Bundler gitignores by default, so commit the checksum-freeGemfile.lockit produces.)
- Don't commit the lock: add
Now create the repo and push it with the GitHub CLI:
git add -A
git commit -m "chore: initial commit"
gh repo create release-please-demo --public --source=. --remote=origin --push
One manual setting is required before Release Please can open a release PR: in the new repo, go to Settings → Actions → General → Workflow permissions and enable Allow GitHub Actions to create and approve pull requests. Without it, the action fails when it tries to open the PR.
The release action will run once you push your changes to the main branch. On this first run there's nothing to release yet: the only commits are chores and build changes, so Release Please finds no user-facing commits and doesn't open a release PR.
Just for reference - here's git log --oneline after the initial push:
c793bca (HEAD -> main, origin/main) chore: initial commit
There are no feat: or fix: commits, so the action did not create a release PR.
Creating a release#
I'm going to cheat and add an empty commit for a feature:
git commit --allow-empty -m "feat: add a feature"
git push -u origin main
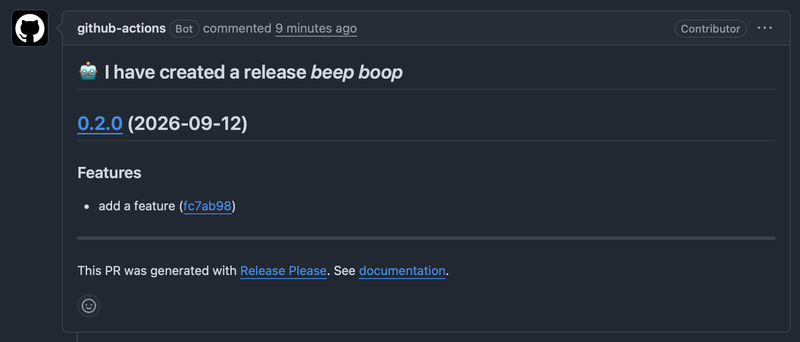
Our release action should run and this time find a user facing commit and open a new release PR. The PR will increment the version number and create a new, or edit an existing, Changelog.
Publish to RubyGems#
Our current setup is great if we just want to automate changelog creation and versioning, but we would still have to publish the gem ourselves after the release was created. Fortunately, we can hook into our existing workflow to automate publishing as well!
You may have noticed we gave our first step an id of release. By doing this, we can check the output of that step in other steps and act accordingly.
Rather than juggle a long-lived RubyGems API token, we'll publish with Trusted Publishing. It uses OpenID Connect (OIDC) so GitHub Actions authenticates to RubyGems.org with a short-lived token minted at publish time. There's no secret to create, rotate, or leak. The rubygems/release-gem action handles the build-and-push for us.
One-time RubyGems setup#
Trusted publishing needs a one-time configuration on RubyGems.org. From the gem's Trusted publishers page, click Create and provide the repository owner, repository name, and the workflow filename (release.yml). For a gem that hasn't been published yet, add a pending trusted publisher from your profile instead, and the first successful publish claims the name. There's no secret to add to GitHub afterward.
Setup Steps#
release-gem assumes your workflow has already checked out the repo and set up Ruby with Bundler, and that your gem has Bundler's release tasks configured (the default Rakefile from bundler gem does). Guarded on release_created, we check out the code and set up Ruby. Per the action's README, the checkout uses persist-credentials: false:
      # Checkout code if release was created
      - uses: actions/checkout@v7
        with:
          persist-credentials: false
        if: ${{ steps.release.outputs.release_created }}
      # Setup ruby if a release was created
      - uses: ruby/setup-ruby@v1
        with:
          bundler-cache: true
          ruby-version: ruby
        if: ${{ steps.release.outputs.release_created }}
ruby-version: ruby tells setup-ruby to use the latest stable Ruby. bundler gem doesn't scaffold a .ruby-version file, so without this input the step has no version to resolve and fails.
Publish Step#
If a release was created, release-gem builds the gem and pushes it to RubyGems over trusted publishing:
- uses: rubygems/release-gem@v1
  if: ${{ steps.release.outputs.release_created }}
For this to work the job needs two permissions: id-token: write (mandatory for trusted publishing) and contents: write (so the release tasks can push the tag). As of v1.1.0, release-gem also generates a build provenance attestation by default.
Release and Publish#
Our final action, with the added id-token: write permission:
# .github/workflows/release.yml

name: release

on:
  push:
    branches:
      - main

permissions:
  contents: write
  pull-requests: write
  id-token: write

jobs:
  release-please:
    runs-on: ubuntu-latest
    steps:
      - uses: googleapis/release-please-action@v4
        id: release
        with:
          token: ${{ secrets.GITHUB_TOKEN }}
      # Checkout code if release was created
      - uses: actions/checkout@v7
        with:
          persist-credentials: false
        if: ${{ steps.release.outputs.release_created }}
      # Setup ruby if a release was created
      - uses: ruby/setup-ruby@v1
        with:
          bundler-cache: true
          ruby-version: ruby
        if: ${{ steps.release.outputs.release_created }}
      # Build and push to RubyGems via trusted publishing
      - uses: rubygems/release-gem@v1
        if: ${{ steps.release.outputs.release_created }}
Commit, push this code, and wait for your release PR to be updated by our action bot. Once the release PR has been updated, merge the PR into your main branch.
Once our release action runs, assuming it succeeds, you should see a new release in GitHub! One great feature of this action is that it will build the release notes from our changelog entries. 🚀
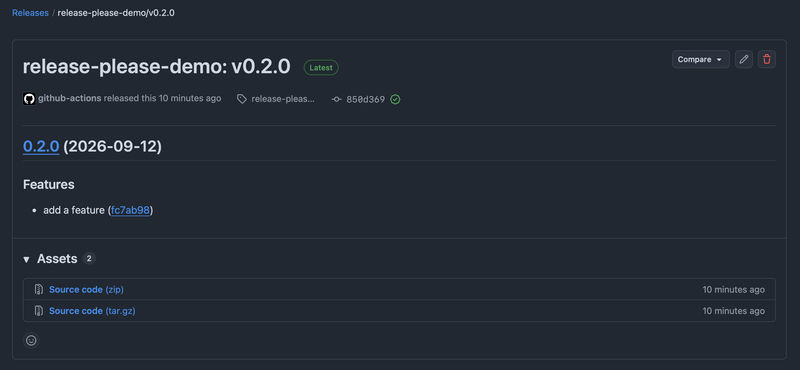
If we check RubyGems, we should see our new gem has been published and is ready to share!
Final Thoughts#
If you followed the tutorial and don't intend to use your new gem, you should consider yanking it to allow others to use the name in the future.
gem yank release-please-demo -v 0.2.0
One great aspect of the action is that you can use it with other languages or a .txt file, allowing you to create consistent pattern across all of your open source. You could enhance the workflow by adding in checks to run the tests before releases and also adding a linter to ensure conventional commits are used. With this workflow, you'll be able to make new releases without pulling down the code and never have to try and remember how you release a project again.
Give it a try and tell me what you think!

